
Overview
Authentication to the Gathid application is performed using Single Sign-on via a trusted Microsoft Entra App Registration. The configuration of this step is detailed in Step 2 below.
Once a person has been authenticated by the Gathid application, authorisation to access functionality or information is enforced using Role Base Access Control. This access is controlled by your organisation's Microsoft Security Groups.
We suggest following this guide in order so that the Security Groups are created before the App Registration. However, this is not mandatory and you can return to the group creation at a later stage.
Summary
- Create the Entra ID Group(s) to be used for Gathid Roles
- Register an Entra ID Application for Gathid Single Sign-On
-
Provide the required information to your Gathid representative
Description
-
Create the Entra ID Group(s) to be used for Gathid Roles
By default, Gathid has three defined roles: ADMINISTRATOR, USER and RESPONDER.
Gathid Roles are mapped to people in your organization's Entra ID using Security Groups. You can use existing Entra ID groups or create specific ones for Gathid Roles.
1.1 Browse to Azure Portal and log in to your organization.
1.2 Navigate to the Groups service. We recommend creating new groups called "Gathid - Administrators, Gathid - Users, and Gathid - Responders) but this is not a requirement.
1.4 Once you have created the group(s), you will need to obtain information about the group so that it can be given to your Gathid representative.
Select the relevant groups to show details.
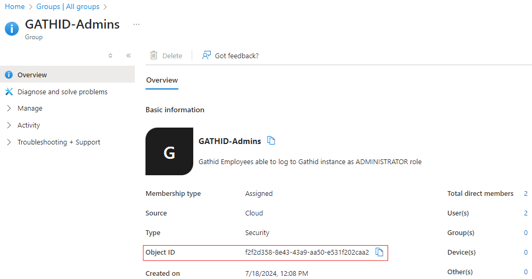
1.5 Copy the Object Id and keep it for future use.
1.6 Add people to these groups when they require access to the Gathid application.
We recommend creating the Administrator group first and assigning at least one person to this role. Return to this step to set up the User and Responder groups when ready.
2. Register an Entra ID Application for Gathid Single Sign-On
2.1 Browse to Azure Portal and log in to your organization.
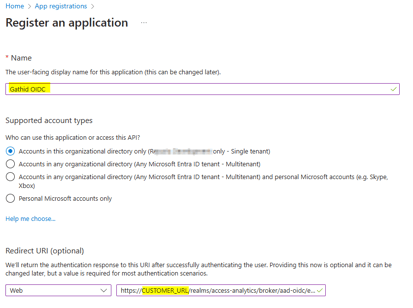
2.2 Navigate to App registrations and select New registration.
2.3 Provide a Name for the application: e.g. “Gathid OIDC”.
2.4 Under Supported account types select: Accounts in this organizational directory only.
2.5 In the Redirect URI (optional) section use the dropdown next to Select a platform to choose: Web.
2.6 Enter your redirect URL in the form of: https://<CUSTOMER_URL>/realms/access-analytics/broker/aad-oidc/endpoint.
Obtain your <CUSTOMER_URL> from your Gathid representative.
2.7 Click to Register the application. You will be redirected to the Overview page of the new application registration just created.
2.8 Copy the Application (client) ID GUID and store it for future use.
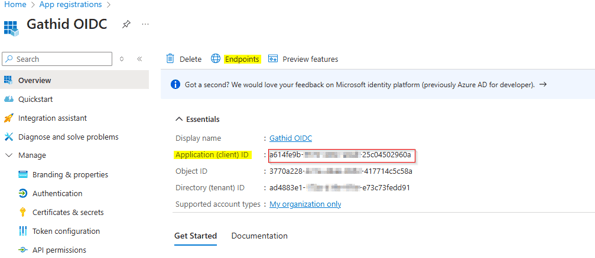
2.9 Select Endpoints from the options at the top of the screen.
From the modal that pops up, copy the OpenID Connect metadata document URL and store it for future use.
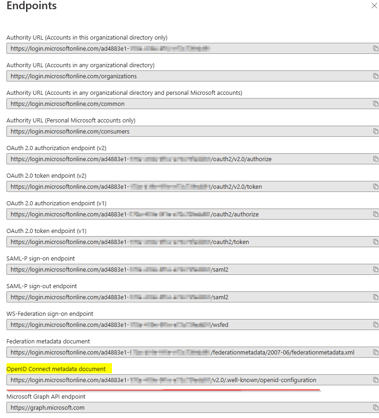
2.10 Close the Endpoints modal.
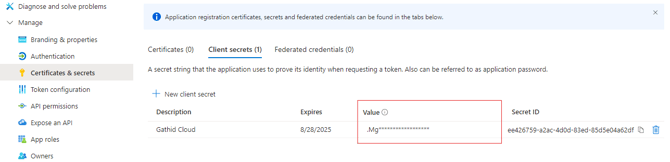
2.11 Select the Certificates & secrets item from under the Manage blade on the left-hand-side.
2.12 Ensure the Client secrets tab is selected and click on New client secret.
Provide an optional Description. e.g.: Gathid Identities and set the Expires period to the maximum (730 days).
Click Add.
2.13 Copy the Value (not the Secret ID) and keep it for future use.
2.14 Select the Token configuration item from under the Manage blade on the left-hand-side.
2.15 Click on Add groups claim.
-
- For companies with less than 50 security groups users, select only Security groups.
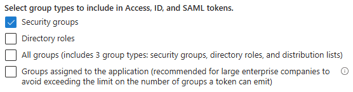
Click Save and skip to step 2. -
For larger organisations who need to limit the number of group claims, tick Groups assigned to the application.
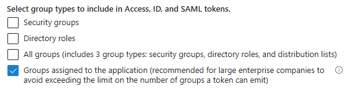
This option requires that groups used to access Gathid are manually assigned to this Enterprise Application. Follow these steps to ensure that the groups used for Gathid access are granted the necessary permissions.
- For companies with less than 50 security groups users, select only Security groups.
In order to proceed with this step, ensure that your Gathid groups have been set up as per Step 1.
-
-
-
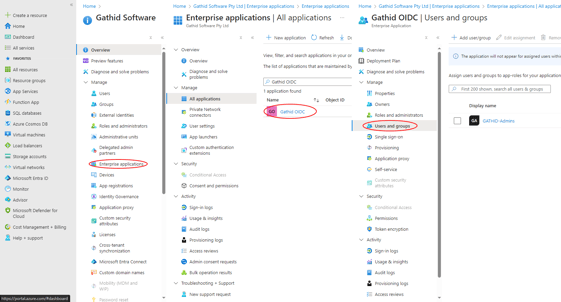
From the Entra ID Home page, navigate to Enterprise Applications, locate your Gathid Application, then select Users and Groups from under the Manage blade on the left-hand-side.
-
Select Add user/group from the menu at the top and locate the group to add.
-
In the Add Assignment page, under Users and groups, click on None Selected.
-
A list of all your Users and Groups will be presented. Tick the relevant Gathid groups in the Groups list and click on Select.
-
-
3. Provide the information to your Gathid representative
Make sure you have a copy of the following and provide to Gathid representative:
- Application (client) ID GUID
- OpenID Connect metadata document URL
- Client value
- Group Object Id for ADMINISTRATOR Role
- (Optional) Groups' Object Ids for other Roles
🖨️ PDF available here: SSO Entra ID Configuration