
Overview
This article relates to version 7.0 of the Hubspot Data Connector.
The connector retrieves a list of Users and other identity information from your Hubspot instance via REST API. Click here to review the loader's system properties.
Authentication is performed using OAuth 2.0 tokens - further details are provided below.
Summary
-
Validate that the new Hubspot connector is available on your Gathid instance
-
Obtain credentials from your Hubspot instance for the Gathid configuration
Steps to configure the Hubspot data connector in Gathid
1. Validate that the new Hubspot connector is available on your Gathid instance
-
As an Administrator user, log into Gathid and navigate to Admin → Systems.
-
You should see a new Hubspot loader in the list, in a Disabled state. If not, follow the process to add a new system.
REMINDER: To be able to view the Admin menu option in Gathid you need to have the ADMINISTRATOR role.
2. Obtain credentials from your Hubspot instance for the Gathid configuration
-
In Hubspot, login as a SuperAdmin and go to Settings, then Integrations, then Service Keys (alternatively, go directly to Development -> Keys -> Service Keys,), and click Create service key.
- Name the Service Key i.e. Gathid Hubspot
-
Add the following new scopes:
settings.users.readandsettings.users.teams.read. - Click Update
-
Create the key and copy the generated token as you will need it in the following section.
3. Configure the Prep Script tab in the Hubspot system loader
- As an Administrator, log into Gathid and navigate to Admin → Systems.
- Select the Hubspot loader and in 1. System Information toggle the System Enabled option to On.
Ensure the correct start time for the loader is set in the Time. This should be close to your instance's stack start time. - Then go to 2. Prep-Scripts and enter the configuration details retrieved in the previous step.
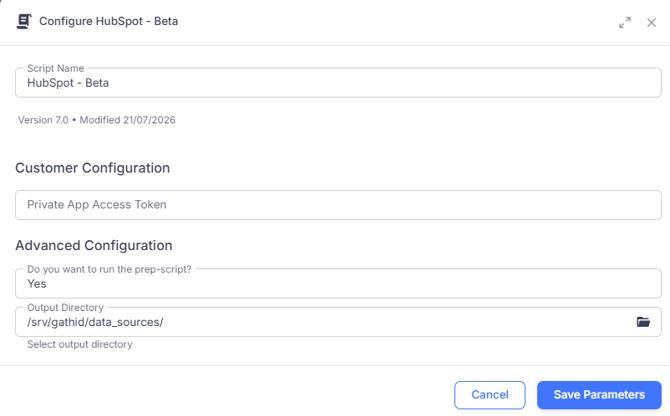
Private App Access Token: The generated key created in step2.3 above.
Next Steps:
System Properties