
The guide outlines the standard process for Gathid Data connector configuration.
The Workday Data Connector is not enabled by default on your Gathid instance.
Contact your Gathid representative to enable the Workday Data Connector on your instance.
Summary
-
Validate that the new Workday API connector is available on your Gathid instance
-
Configure your instance of Workday (view the configuration guide)
- Enable the Loader
Steps to configure the Workday data connector in Gathid
1. Validate that the new Workday API connector is available on your Gathid instance
-
As an Administrator user, log into Gathid and navigate to Administration → Loaders.
-
You should see new Workday loader in the list, in a Disabled state.
REMINDER: To be able to see Administration menu option you need to be in ADMINISTRATOR role.
2. Configure your instance of Workday
- This guide has been created to assist you with setting up and configuring your Workday instance. Please follow the steps in the Workday Customer Configuration Guide.
- This configuration allows Gathid to obtain a subset of information about your People/Workers. It can be changed in Step 12 of the guide.
The default set of attributes retrieved by the Workday API System Connector are:
- Employee Id
- Worker
- Legal Full Name
- Legal First Name
- Legal Last Name
- Preferred Full Name
- Preferred First Name
- Preferred Last Name
- User Name
- Active Status
- Termination Date - All
- Manager – Level 01
- Job Title
- Job Code
- Email – Primary Work
- Location Name
- Short Description
- Division
- Worker Type
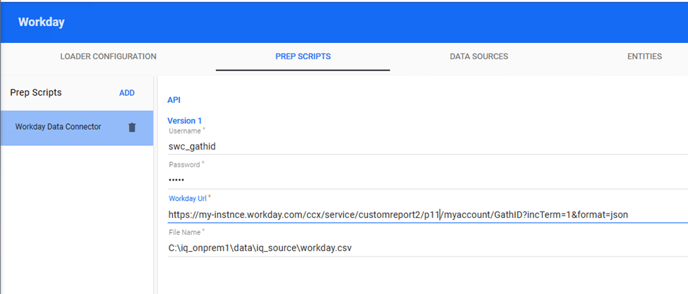
3. Configure PREP SCRIPTS tab in the Workday Loader
- As an Administrator user, log into Gathid and navigate to Administration → Loaders.
- Select Workday → PREP SCRIPTS tab.
- Populate values for Username and Password as created in the Workday configuration in Step 2 above.
- Add the Workday Url generated in Step 13 of the guide. Gathid will use this to extract your data in JSON format.
- Leave the File Name unchanged.
4. Enable the Loader
-
Navigate to LOADER CONFIGURATION tab, and toggle the Loader is Disabled to ON. This will enable the loader:
Note We do not create External Relationship on HR systems. These are - Click SAVE

- Notify your Gathid team that you have configured and enabled your Workday Loader, and your support team will validate connectivity during stack run.